Python
Python
操作数据库
MySQL
Redis
pip install redis
连接
import redis

con = redis.StrictRedis(
    host='127.0.0.1',
    port=6379,
    db=4, # 数据库默认没有名字,通过0-15来表示,一共16个
    decode_response=True
)
爬虫
代理
代理的使用形式
proxies_dict = {
   "http": "http://" + ip:端口,
   "https":"https://" + ip:端口,
}
XPath
可以安装这个插件,辅助书写xpath


// 表示跨节点
div[] 表示选择div标签,里面 @id @class 可以根据id和class定位
示例:
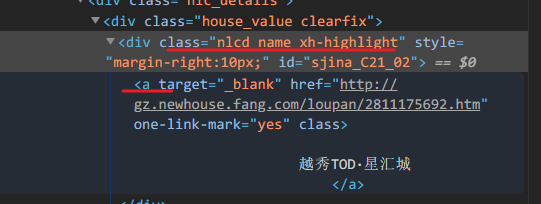
//div[@class="nl_con clearfix"]/ul/li 表示定位到div标签下的ul,再往下定位到li,符合要求的在网页用黄色高亮

但是选择的有两条内容是广告,标签包含style属性,可以利用 [not(@属性)] 将其剔除
//div[@class="nl_con clearfix"]/ul/li[not(@style)]

继续往下获取,获取a标签的文本和链接
//div[@class="nl_con clearfix"]/ul/li[not(@style)]//div[@class="nlcd_name"]/a/text()
//div[@class="nl_con clearfix"]/ul/li[not(@style)]//div[@class="nlcd_name"]/a/@href
contains
取包含 '某文字' 三个字的节点
//ul[@id="uid"]/li/a[contains(text(), "某文字")]
取 id 包含 'uu' 三个字的节点
//ul[@id="uid"]/li/a[contains(@id, "uu")]
start-with
//ul[@id="uid"]/li/a[start-with(@id, "uu")]
ends-with
//ul[@id="uid"]/li/a[ends-with(@id, "uu")]
CSS 选择器
| 选择class : | # | |
|---|---|---|
| 选择id : | . | |
| 选择标签属性 | a::attr(href) | |
| 只需要标签里的文字内容 | a::text |
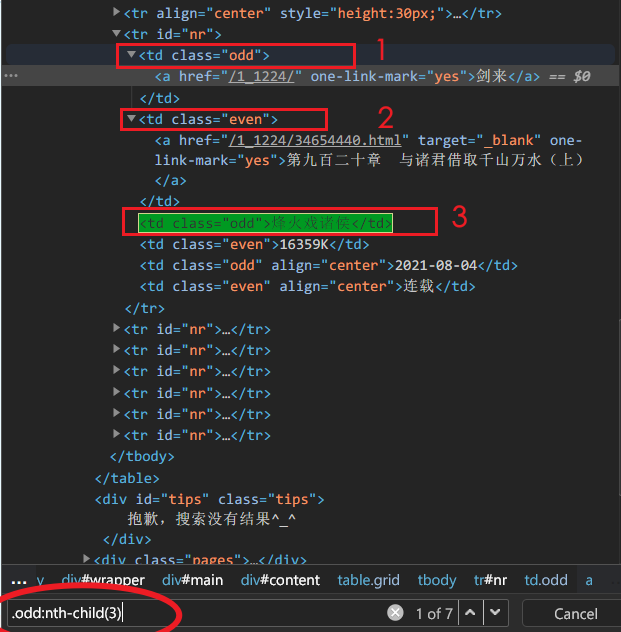
name = i.css('.odd a::text').get()  # 获取标签文本
href = i.css('.odd a::attr(href)').get() # 获取标签属性
author = i.css('.odd:nth-child(3)::text').get() # 如果有相同的,可以用:nth-child()来确定位置
css选择器结合正则表达式
title = selector.css("title::text").re("(\S\S)")[0]
print title
# 百度
文件路径操作
获取当前 py 文件的绝对路径:
p1 = os.path.abspath(__file__)
返回当前文件的绝对路径
存在软连接时,返回软连接文件路径
p2 = os.path.realpath(__file__)
返回当前文件的标准路径,而非软链接所在的路径
操作 Windows
操作剪贴板
pip install pyperclip
调用 Windows API
pip install pypiwin32
根据窗口标题找窗口
切换窗口
def switch_roles(hwnd):
    """
    功能: 切换窗口
    参数 hwnd: 窗口句柄, 十六进制的六位数字
    """
    ctypes.windll.user32.SwitchToThisWindow(hwnd, True)
    win32gui.ShowWindow(hwnd, win32con.SW_SHOWNORMAL)
    win32gui.SetForegroundWindow(hwnd)
调用 Windows 10 / 11 通知
pip install win10toast
pip install win11toast
第三方包的使用
colorama
打印带颜色
pip install colorama
from colorama import init, Style, Back, Fore

# 初始化
init(autoreset=True)

print(
    Style.BRIGHT +
    Back.YELLOW +
    Fore.RED +
    "Colorama ")
pyinstaller
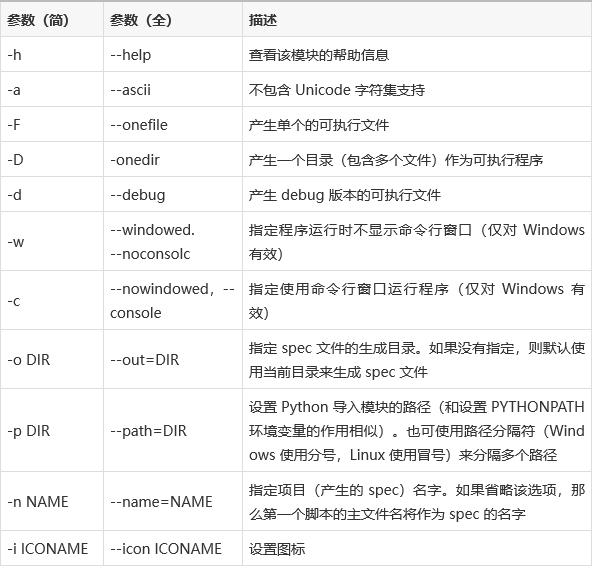
将 Python 代码打包成可执行文件 .exe
pip install colorama
httpx
支持 http 2.0 的请求库
pip install httpx
from random import randint
import asyncio
from time import sleep
from concurrent.futures import ThreadPoolExecutor
from httpx import AsyncClient


async def Request():
    try:
        async with AsyncClient() as h:  # 异步请求
            res = await h.post(url="https://www.70461.uk/getip.php")
            print(res.json(), sep='\n')
    except TimeoutError:
        print('连接超时')
    finally:
        return


def main():
    tasks = [Request() for _ in range(100)]  # 创建10个任务
    done, pending = asyncio.run(asyncio.wait(tasks))  # 运行任务


while True:
    try:
        with ThreadPoolExecutor() as thread:
            for _ in range(100):  # 创建100个线程
                thread.submit(main)  # 提交任务
        sleep(randint(0, 5))
    except Exception:
        print('运行出错')
        continue
isort
自动整理 import
pip install isort
openpyxl
读写 Excel 文件 (.xlsx)
pip install openpyxl
打开 Excel 文件
from openpyxl import load_workbook
wb = load_workbook('./模板.xlsx', read_only=True, data_only=True)	# 只读、只读数据
ws = wb[wb.sheetnames[0]]	# 获取第一个工作表 选择表(sheet)
获取最大行数、列数
ws.max_row
ws.max_column
单元格访问
ws.cell(row=1, column=3).value遍历
for val in ws_write.iter_rows(min_row=1):
    print(val[0].value, val[1].value)
for row in range(1, ws.max_row + 1): print(ws.cell(row=row, column=3).value)
PyTorch
pip install torch==1.8.0 torchvision==0.9.0 torchaudio==0.8.0
进程、线程、进程池、线程池
进程 Process
进程的介绍
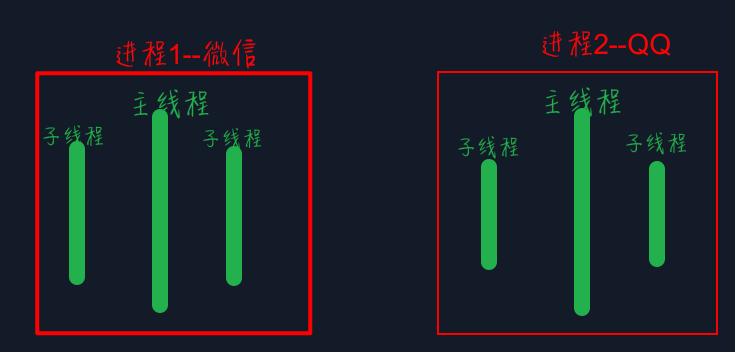
进程是实现多任务的一种方式。通俗地说,一个程序就相当于一个进程,一个进程又可以有许多的线程。
一般一个软件对应一个进程,但有些软件可以有多个进程,比如Chrome浏览器,每一个标签页就是一个进程。
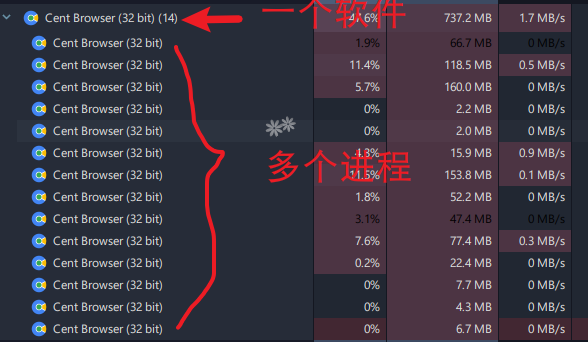
也就是操作系统进行资源分配的基本单位,按软件进行分配。
下图演示的是一个py文件创建3个进程,一个进程负责一个任务,那么就可以多任务执行了。
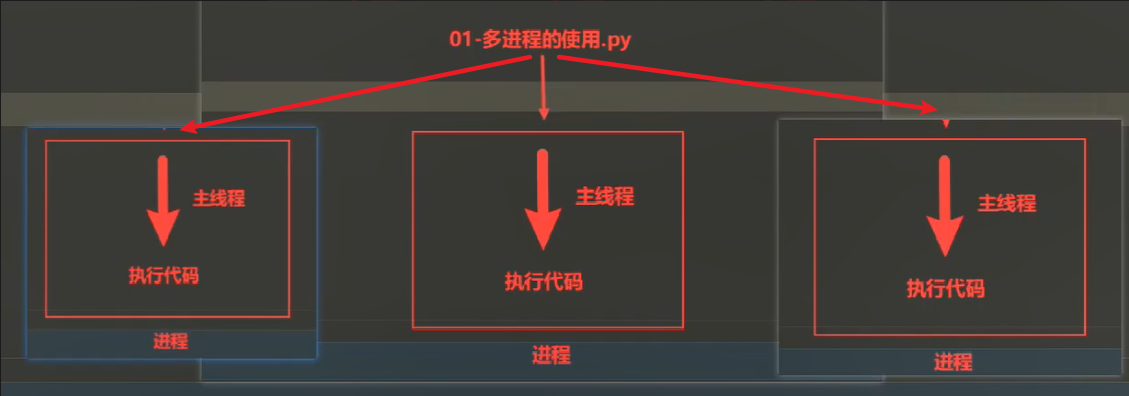
创建多进程
import multiprocessing #导入多任务处理包

def dance():
    print("跳舞")

def sing():
    print("唱歌")

if __name__ == '__main__': # 主进程
    # 创建进程
    dance_process = multiprocessing.Process(target=dance)
    sing_process = multiprocessing.Process(target=sing)

    # 启动进程执行对应的任务,它们是同时执行的
    dance_process.start()
    sing_process.start()
当上面的代码运行时,会创建3个进程,一个主进程,2个子进程(dance,sing)
获取当前进程的编号
os.getpid()
import os
def dance():
    print('跳舞函数的编号是:',os.getpid())
    print("跳舞")

def sing():
    print('唱歌函数的编号是:',os.getpid())
    print("唱歌")
获取父进程的编号
os.getppid()
def dance():
    print('跳舞函数的编号是:', os.getpid())
    print('跳舞函数的父进程编号是:', os.getppid())
    print("跳舞")

def sing():
    print('唱歌函数的父进程编号是:', os.getppid())
    print('唱歌函数的编号是:', os.getpid())
    print("唱歌")
开启进程给函数传参
方法一:利用args,传的是元组
sing_process = multiprocessing.Process(target=sing, args=(10,))
方法二:利用kwargs,传的是字典
sing_process = multiprocessing.Process(target=sing, kwargs={'data':10})
def sing(data):
    print('唱歌函数的父进程编号是:', os.getppid())
    print('唱歌函数的编号是:', os.getpid())
    print("唱歌")

if __name__ == '__main__':
    print('主进程的进程编号是',os.getpid())
    # 创建进程

    sing_process = multiprocessing.Process(target=sing, args=(data,)) # 用args,元组的形式传参,一个元素的元组,要加逗号

    # 启动进程执行对应的任务
    dance_process.start()
进程注意事项
- 进程之间不共享全局变量
import time
import multiprocessing
g_list = [] # 全局变量

def add_data(): # 添加数据
    for i in range(5):
        g_list.append(i)
        print("添加数据",i)
        time.sleep(0.2)

def read_data(): # 读取数据
    print("读取数据",g_list)

if __name__ == '__main__':
    print(g_list) # 仍然是空
    one_process = multiprocessing.Process(target=add_data)
    two_process = multiprocessing.Process(target=read_data)
    # 启动进程执行对应的任务
    one_process.start()
    two_process.start()

 虽然add_data() 添加了数据,但是在read_data()进程里g_list 仍然是空的,尽管主进程也是空的
- 主进程会等待所有子进程结束才结束
进程池
from cocurrent.fetures import ProcessPoolExecutor

def function(val):
    ...
    ...

pp = ProcessPoolExecutor(max_workers=5)

for i in range(5):
    pp.submit(function, i)

pp.shutdown()
线程 Thread
基本介绍
比如说百度网盘,下载是一个线程,上传也是一个线程,在线看视频也是一个线程,它们可以同时进行。
import threading # 导入线程包

def task():
    time.sleep(1)
    print('当前线程',threading.current_thread().name)

 # 创建多(子)线程的方式
sub_thread = threading.Thread(target=task)

# 开启线程
sub_thread.start()
如果待执行函数带有参数,则可以通过args和kwargs 来传参
例如:
def dance(cout):
    for i in range(cout):
        print('跳舞')
        time.sleep(1)
dance_thread = threading.Thread(target=dance, args=(2,)) # 给函数传参,方法一
dance_thread = threading.Thread(target=dance, kwargs={'cout':3}) # 给函数传参,方法二,通过字典形式
由于主线程会等待所有子线程执行结束再结束,有时候不方便,我们可以设置当主线程结束后,顺便将所有子线程也结束掉。
- 方法一:在创建时设定daemon为True
sub_thread = threading.Thread(target=show_info, daemon=True) # 守护线程,主线程结束则所有子线程也结束
- 方法二:创建好之后使用setDeamon(True)即可
sub_thread.setDaemon(True)
线程池
import threading

def function():
    ...
    ...

threads = []
for file in os.listdir('./csv_file'):
    t = threading.Thread(target=function, args=(file,))
    threads.append(t)

if __name__ == '__main__':
    for thr in threads:
        thr.start()
        thr.join()
from cocurrent.fetures import ThreadPoolExecutor

def function(val):
    ...
    ...

tp = ThreadPoolExecutor(max_workers=5)

for i in range(5):
    tp.submit(function, i)

tp.shutdown()
线程同步的方式
- 方法一:线程等待
sub_thread.join() # 表示sub_thread这个线程执行完成后再执行下一个线程
- 方法二:互斥锁
可以给线程加一个锁,每次使用先开锁,使用过程加上锁,这样别的线程就无法用。但是加上锁之后就变成了单任务了,同一时刻只有一个线程在执行任务,性能会降低。但是能保证多线程使用全局变量的时候不会出现错误。
线程之间共享全局变量
g_list = [] # 全局变量

def add_data():
    for i in range(5):
        g_list.append(i)
        print('添加数据:',i)
        time.sleep(0.2)

def read_data():
    print('读取数据:',g_list)

add_thread = threading.Thread(target=add_data)
read_thread = threading.Thread(target=read_data)
add_thread.start()
add_thread.join()
read_thread.start()
实例
import threading # 导入线程包

g_sum = 0

def sum_num1():
    for i in range(1000000):
        global g_sum
        g_sum += 1
    print('sum1',g_sum)

def sum_num2():
    for i in range(1000000):
        global g_sum
        g_sum += 1
    print('sum2',g_sum)

    one_thread = threading.Thread(target=sum_num1)
    two_thread = threading.Thread(target=sum_num2)
    one_thread.start()
    one_thread.join() # 线程等待,这样都输出2000000
    two_thread.start()
协程 Coroutine
asyncio
进程和线程的对比
① 线程之间的执行是无序的,由操作系统去调度具体的线程,进程之前也是无序的
② 进程之间不会共享全局变量,线程之间共享全局变量
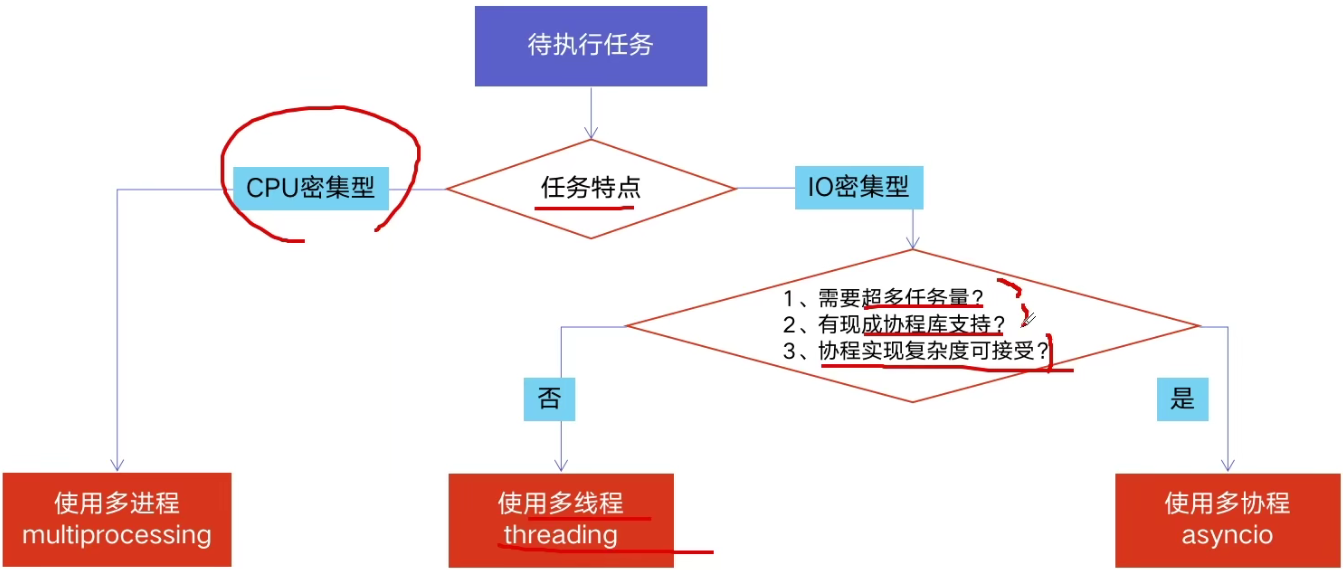
多进程、多线程、多协程对比
一个进程可以启动N个线程
一个线程可以启动N个协程
'''多进程 Process (multiprocessing)'''

	* 优点:可以利用多核CPU进行并行运算
    * 缺点:占用资源最多、可启动数目比线程少
    * 适用于:CPU密集型计算
'''多线程 Thread (threading)'''

	* 优点:相比进程,更轻量级、占用资源少
    * 缺点:
    		① 相比进程,多线程只能并发执行,不能利用多CPU(python有GIL)
        	② 相比协程,启动数目有限制,占用内存资源,有协程切换开销
    * 适用于:IO密集型计算、同时运行的任务数目要求不多
'''多协程 Coroutine (asyncio)'''

	* 优点:内存开销最小、启动协程数量最多
    * 缺点:支持的库有限制(aiohttp vs requests)、代码实现复杂
    * 适用于:IO密集型计算、需要超多任务执行、但有现成库的场景
到底应该选择哪个来用?
Web 框架
### Django
python打开json文件
with open("CoorOfXiaoqu.json",'w') as file_obj:
	json.dump(result_dict,file_obj)
python保存json文件
import json
with open('文件名.json','w') as file:
        json.dump(数据,file)
前端根据url请求:
var count = 400;
var lon = new Array(count);
var coordinates = new Array(count);
var lat = new Array(count);
var dataSource = new Array(count);
    $.ajax({
        url: "这里放url路径",
        type: 'get',
        data: {
            "参数"
        },

        dataType: 'json',
        async: false,
        success: function(results) {
          //  console.log(results);
            // alert(results);
            dataSource = results;

            for (var i = 0; i < results.length; i++) {
                 lat[i] = results[i][4];
                 lon[i] =  results[i][5];
            }
        }
    });
表单
    <!-- 表单 -->
    <form action="/test/test1" method="POST">
       <!-- {% csrf_token %}-->
    <div class="test" id="test-button">
    </div>
    </form>
跨域
pip install django-cors-headers
settings.py
# 跨域设置
CORS_ALLOW_CREDENTIALS=True
CORS_ORIGIN_ALLOW_ALL=True

# 以安装的应用
INSTALLED_APPS = [
    'corsheaders',
	...
]

MIDDLEWARE = [
    # 定义跨域中间件
    'corsheaders.middleware.CorsMiddleware',
    'django.middleware.common.CommonMiddleware',
	...
]
配置局域网访问
ALLOWED_HOSTS = ['*']
配置安装的APP
INSTALLED_APPS = [
    'django.contrib.admin',
    'django.contrib.auth',
    'django.contrib.contenttypes',
    'django.contrib.sessions',
    'django.contrib.messages',
    'django.contrib.staticfiles',
    'gis', #自己新建的APP,要添加进来
]
配置数据库
# 数据库使用PostgreSQL
DATABASES = {
    'default': {
    'ENGINE': 'django.db.backends.postgresql_psycopg2',
    'NAME': 'citygis',
    'USER': 'postgres',
    'PASSWORD': '123',
    'HOST': 'localhost',
    'PORT': '5432',
  }
}
# 数据库使用MySQL
DATABASES = {
'default':{
      'ENGINE' : 'django.db.backends.mysql',
      'USER': 'root',
      'PASSWORD' :'root',
      'NAME' : 'citygis',#数据库名
      'HOST' : '127.0.0.1',
      'PORT' : 3306,
      'CHARSET' : 'utff-8',
  }
}
# 数据库使用SQLite----默认就是用这个
DATABASES = {
'default': {
      'ENGINE': 'django.db.backends.sqlite3',
      'NAME': BASE_DIR / 'db.sqlite3',
  }
}
配置完成要迁移数据库:
配置语言和时区
LANGUAGE_CODE = 'zh-hans'

TIME_ZONE = 'Asia/Shanghai'

USE_I18N = True

USE_L10N = True

USE_TZ = False
配置静态模板
# 静态文件配置

STATIC_URL = '/static/'  # 别名
STATICFILES_DIRS = (
    os.path.join(BASE_DIR, 'app1/templates/static'),
)
# Static files (CSS, JavaScript, Images)
# https://docs.djangoproject.com/en/3.2/howto/static-files/
模板HTML写法
{% load static %}
<!doctype html>
<html lang="en">
<head>
    <link rel="stylesheet" href="{% static 'css/style.css' %}" />
    <script src="{% static 'js/script.js' %}"> </script>
上传文件并解析内容
利用表单,上传文件,
acition:文件上传的地址,后台需要实现对应接口
method:数据提交的方式,必须为POST
enctype:发送数据类型,上传文件时必须为multipart/form-data
<form class="upload" id="upload" action="http://127.0.0.1:8000/api/show" method="POST" enctype="multipart/form-data">
  <div class="container">
    <input type="file" name="upload_file" id="file_id" accept=".json" > <!--name是必须的,后面可以价格multiple表示多选文件-->
    <input type="submit" value="提交">
  </div>
    <div class="map" id="map"></div>
</form>
后端处理数据,利用 request.FILES.get("upload_file"),获取上传的文件
def show(request):
    received_file = request.FILES.get("upload_file") # upload_name是input按钮的name,必须一样
    filename = os.path.join(MEDIA_ROOT, received_file.name)

    saveFile(received_file,filename)

    return JsonResponse({
        'result': 'OK',
        'status': 200,
        'filename': received_file.name,
        'length': received_file.size,
        'content': readFile(filename),
    })

# 保存上传的文件
def saveFile(received_file, filename):
    with open(filename, 'wb')as f:
        f.write(received_file.read())
    # ff = open(filename,'wb')
    # for chunk in received_file.chunks():
    #     ff.write(chunk)
    # ff.close()

# 读取上传的文件内容,并返回
def readFile(filename):
    with open(filename,'r')as f:
        content = f.read()
    return content
Shodan
参考教程:https://mp.weixin.qq.com/s/ubJ_3EDT34ao4m_quJQmQA
Shodan 爬取的是互联网上所有设备的 IP 地址及其端口号。

使用python联合Shodan进行搜索
安装
pip install shodan
注册账号获取API
注册网址:https://account.shodan.io/register
输入完相关信息,点击 CREATE 会跳转到个人账户页,此时 API Key 会显示你的API秘钥,请记录这个秘钥,后续会使用到这个秘钥去请求接口。
from shodan import Shodan

api = Shodan('你的API KEY')

def search_shodan(keyword):
    # 调用搜索接口
    result = api.search(keyword)

    # 显示所有IP
    for service in result['matches']:
            print(service['ip_str'])

search_shodan("Hikvision-Webs")
